Getting Started
Agence is a layer 1 blockchain platform with a goal to onboard the mass market through first class NFTs, delegated transactions fees, and EVM Compatibility. This document provides details on how to interact with the Agence Network specifically for developers and node operators.
Installation
The easy way to install is to run the following command.
curl --proto '=https' --tlsv1.2 -sSf https://storage.googleapis.com/aetheras-public/get_agence/install.sh | bash
Takecopter Testnet
Takecopter is Agence's development testnet. Like many other blockchain networks, it is designed for developers of the whole ecosystem to be able to test everything, including node updates and DApp development.
These are the important links for the Testnet:
Evm Compatibility
Agence supports EVM and Ethereum Transactions, which means the network can handle smart contracts written
in Solidity and Viper. The takecopter testnet's public RPC url is https://takecopter.cloud.agence.network.
This URL can be entered into any ethereum compatible wallet, such as Metamask. There is a shortcut button at the
ethereum block explorer
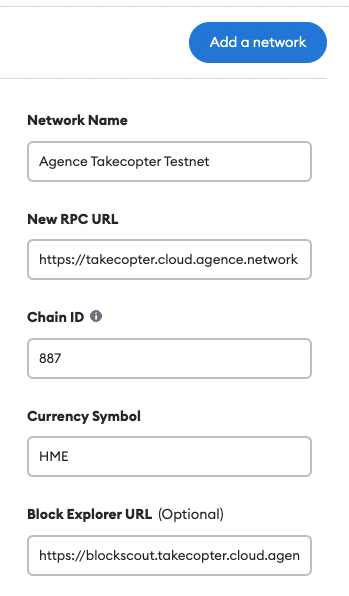
To add the Takecopter Testnet manually, use the following settings:
Interacting with Chain through Agence Command (acmd)
We have provided the acmd command line tool to help users interact with the network. Make you have already
executed the installation script.
cd ~/.agence/bin

# ws://localhost:9944 will be used if the node rpc parameter is ommitted
~/.agence/bin/acmd wss://ws.takecopter.cloud.agence.network
Connected to: wss://ws.takecopter.cloud.agence.network
 chain: Takecopter Testnet
 client: Agence Node 0.10.0-a46d67a-x86_64-linux-gnu
 token: [HME]
 token decimals: [18]
 ss58 prefix: 887
agence>
From now on, you can use acmd to query data using an interactive javascript terminal.
You can press tab to show all the possible matches to an api.query:
agence> await api.query. #TAB
api.query.__defineGetter__          api.query.__defineSetter__          api.query.__lookupGetter__          api.query.__lookupSetter__          api.query.__proto__
api.query.constructor               api.query.hasOwnProperty            api.query.isPrototypeOf             api.query.propertyIsEnumerable      api.query.toLocaleString
api.query.toString                  api.query.valueOf

api.query.assets                    api.query.auctions                  api.query.authorship                api.query.babe                      api.query.balances
api.query.council                   api.query.elections                 api.query.forges                    api.query.grandpa                   api.query.imOnline
api.query.indices                   api.query.offences                  api.query.randomnessCollectiveFlip  api.query.recovery                  api.query.session
api.query.staking                   api.query.substrate                 api.query.sudo                      api.query.system                    api.query.timestamp
api.query.transactionPayment        api.query.treasury
Creating an Account
If you want to sign and submit extrinsic to change the state of the chain, you need to create your own account first.
Agence account consists of a public and private key pair, as well as an address which are generated from a group of mnemonic seed phrase.
To get a new phrase, run the commands below in other terminal window:
cd ~/.agence/bin

# ${WORD_COUNT} is 12 by default
./acu key generate ${WORD_COUNT}
It will show following output, please backup and save your secret phrase:
Secret phrase `electric kit dream idea comic trigger simple vanish seek group blade angle` is account:
  Secret seed:      0x7d5a460e2dc8c7cc4921f5f68dd3c7c0ca774c81084c31389cdb3ffbfcaf8238
  Public key (hex): 0x3e681d4d0c49cd928226d95c6f0422ebbb0273fe69cb3a95fc2c50f1b4977117
  Account ID:       0x3e681d4d0c49cd928226d95c6f0422ebbb0273fe69cb3a95fc2c50f1b4977117
  SS58 Address:     SUA2p2buoGnsRe2HVoF9EyP39zwL9Bfacq3nKanYVtdEo5Xb
To insert your newly created keypair into acmd, run the following command, where secret_phrase is the phrase you haved created on last step:
agence> const keypair = this.keyring.addFromUri(secret_phrase, {})
To show your account address in SS58 format, just run:
agence> keypair.address
HUME
The native token on Agence is HUME(HME). Accounts can request HME on the Testnet Faucet.
Account Balance
To check the HME balance of specific agence account, you can execute following command in acmd:
(await api.query.system.account(${ADDRESS})).toHuman()
It will return following results that contains your account details:
{
  nonce: '3',
  consumers: '2',
  providers: '1',
  sufficients: '0',
  data: {
    free: '789,961,019,998,007,013,458',
    reserved: '0',
    miscFrozen: '500,000,000,000,000,000,000',
    feeFrozen: '500,000,000,000,000,000,000'
  }
}
Transfer HME
If you want to transfer your HME to another account, try the command below:
await api.tx.balances.transfer(${DESTINATION_ADDRESS}, ${AMOUNT}).signAndSend((keypair, result) => {console.log(JSON.stringify(result))})
Forges
Overview of Forges
A Forge is an entity for minting Assets. An account can possess multiple forges, and as many as they deem necessary.
Accounts may want multiple forges as a way to segregate which sets of assets are supported by which games.
Creating a Forge
To create a forge, users can run the command:
await api.tx.forges.createForge().signAndSend(keypair, result => {console.log(JSON.stringify(result))})
This will create a new forge, and for the current testnet, take_copter, this will cost 100 HME to execute. The HME will be divided amongst the validators and the community pool.
The corresponding logs will also be returned.
{"events":[],"status":{"Ready":null}}
{"events":[],"status":{"Broadcast":["12D3KooWN9LGk4nEAZCMA67ioxF4yCe7au7tMq7R6uJDPVxYwBDm"]}}
{
  "dispatchInfo": {
    "weight": 510394471,
    "class": "Normal",
    "paysFee": "Yes"
  },
  "events": [
    {
      "phase": {
        "ApplyExtrinsic": 1
      },
      "event": {
        "index": "0x0003",
        "data": [
          "SVDhDxQbbgqUyP7ZdUunYN9KPKEUbxHFrf5UsaF1MwhR9wpQ"
        ]
      },
      "topics": [

      ]
    },
    {
      "phase": {
        "ApplyExtrinsic": 1
      },
      "event": {
        "index": "0x0400",
        "data": [
          "SVDhDxQbbgqUyP7ZdUunYN9KPKEUbxHFrf5UsaF1MwhR9wpQ",
          10000000000
        ]
      },
      "topics": [

      ]
    },
    {
      "phase": {
        "ApplyExtrinsic": 1
      },
      "event": {
        "index": "0x1600",
        "data": [
          46,
          "SY3GFws1bxSiXmS6Zn5HgiPiguBhN8r4fKxvgdMux84K1EZm"
        ]
      },
      "topics": [

      ]
    },
    {
      "phase": {
        "ApplyExtrinsic": 1
      },
      "event": {
        "index": "0x0906",
        "data": [
          185600000
        ]
      },
      "topics": [

      ]
    },
    {
      "phase": {
        "ApplyExtrinsic": 1
      },
      "event": {
        "index": "0x0000",
        "data": [
          {
            "weight": 510394471,
            "class": "Normal",
            "paysFee": "Yes"
          }
        ]
      },
      "topics": [

      ]
    }
  ],
  "status": {
    "InBlock": "0x3f15607eb788372c74a37f5a4670de906017dbbb2c6ebde171359e2849cdbf74"
  }
}
Assuming that you submitted using the wallet SY3GFws1bxSiXmS6Zn5HgiPiguBhN8r4fKxvgdMux84K1EZm, you can find the id of newly created forge in the logs by searching for it. In the example above, 46 is the id of the forge.
"event":
{
  "index": "0x1600",
  "data": [
    46,
    "SY3GFws1bxSiXmS6Zn5HgiPiguBhN8r4fKxvgdMux84K1EZm"
  ]
}
Creating AssetKinds
Before starting to create new assets, we need to create new assetKind as the template for them.
await api.tx.forges.createAssetKind(forgeId, assetKindId, ipfsHash, alternatveDataUri).signAndSend(keypair , result => {console.log(JSON.stringify(result))})
Creating Assets
Once the Forge and AssetKinds are created, assets can be created with the following command:
await api.tx.forges.createAsset(destination, forgeId, assetKindId, metadata, result => {console.log(JSON.stringify(result))})
Royalties
As a reward mechanism to forge owner, whenevenr any assets created by the forge are transferred through auction market, the forge owner will receive some of the auction price as royalty.
//#TODO: We can show the royalty section in MyForge page in future.
Assets
In Agence, every account can own assets, which can translate to in-game items, etc. The format of information that is stored in the assets.
The asset ID is currently defined as <ForgeID>x<AssetKindID>x<AssetId>, so 3x1111x2 would represent the 2nd created asset from Forge 3 with AssetKind 1111.
View owned Assets
We can check account's owned assets on AgenceExplorer's AccountDetail page:
https://explorer.takecopter.agence.network/<account_address>
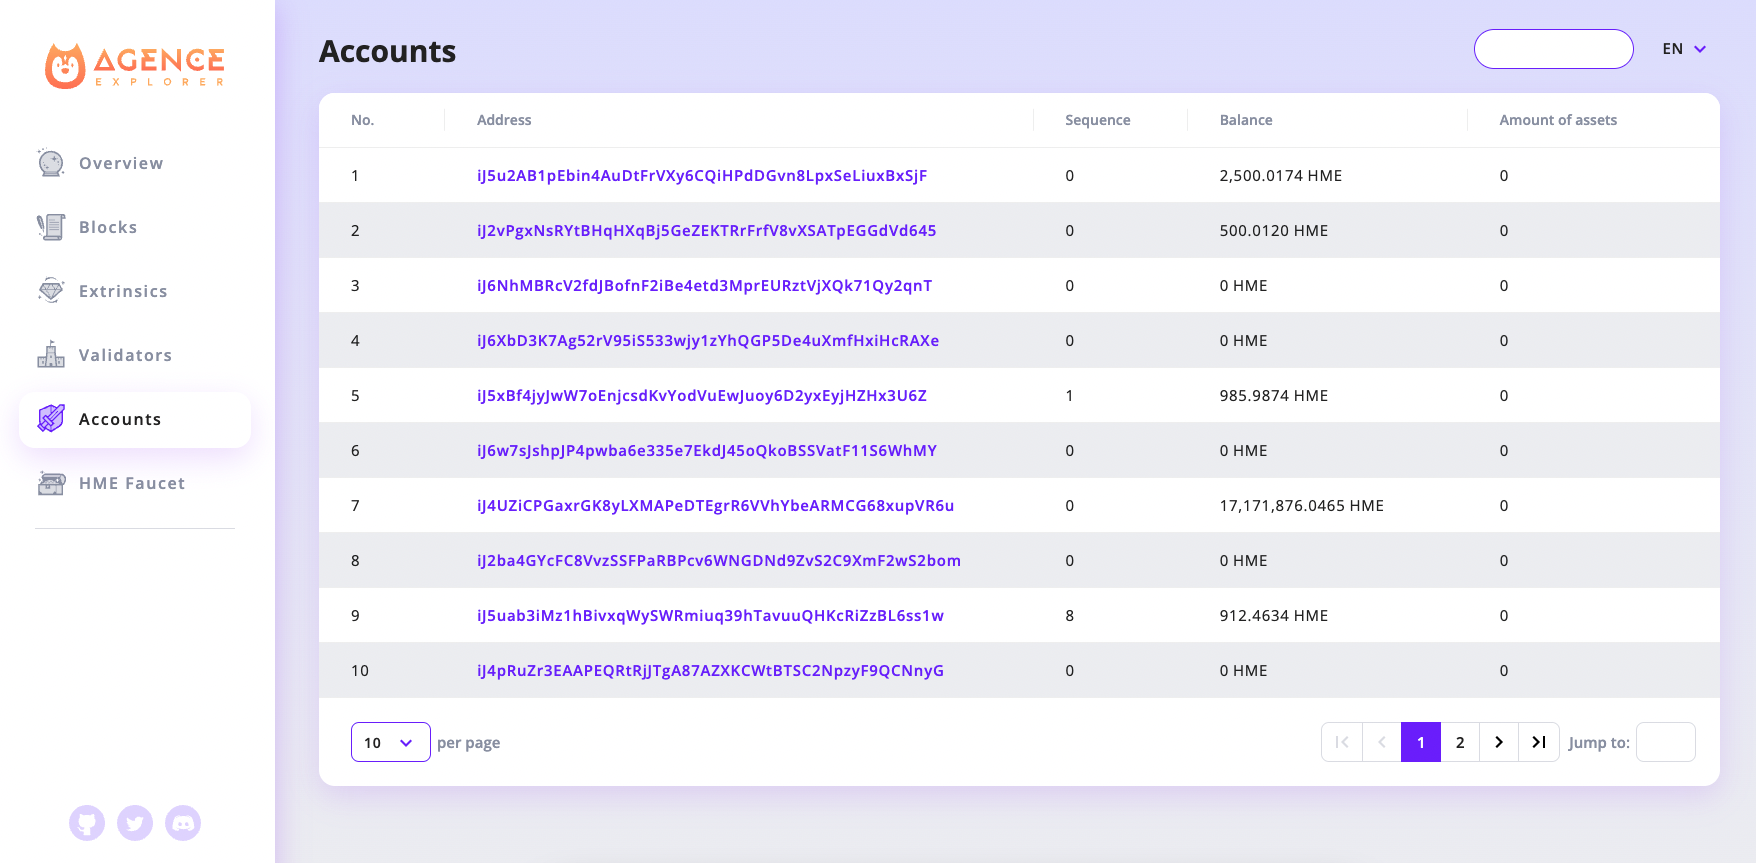
Currently, the recommended way to store asset data is to store the bulk of the data on IPFS. In the picture above, we are only storing the IPFS hash of the asset on the chain, while the rest of the data is on IPFS.
There, you will find a directory with an attrs.json file to serve as its index file. As we progress, we intend to have standard formats set and iterated upon.
Query AssetKind
Using forgeId + assetKindId, we can query assetKind as follows:
JSON.stringify(await api.query.assets.assetKind([forgeId, assetKindId]))
example output:
'{
    "data_hash": "0x516d616832684b744a597774616d344533346354395447363764614c7574644d7342734878364c79696e4a76424c",
    "data_uri": null,
    "volume": 103
}'
Query Asset
Using forgeId + assetKindId + assetId, we can query asset as follows:
JSON.stringify(await api.query.assets.asset([forgeId, assetKindId, assetId]))
Example output:
'{
    "owner": "SWvNjWfEoTavvuMtM4DLyYKd2Myn6duBeG51vSmbqpcyGuT5","metadata":"0x6d657461"
}'
Transferring Assets
In order to send an asset from one account to another, the following command can be executed:
await api.tx.assets.transfer(destination, [forgeId, assetKindId, assetId]).signAndSend(keypair , result => {console.log(JSON.stringify(result))})
Where destination is the recipient's address.
Auctions
In Agence supports a built in Auction module. We can create our own auction to sell assets or buy new assets by bidding on existing auctions.
Create Auction
Agence support three types of auctions:
-
BASIC: which is the most common type that the bidder with highest price wins at the end of the auction duration
Creation commands in
acmd:const auctionKind = api.createType("AuctionKind", 0) await api.tx.auctions.createAuction(auctionKind, [forgeId, assetKindId, assetId], startPrice, duration_millisec).signAndSend(keypair, result => {console.log(JSON.stringify(result))}) -
WITH_BUY_NOW: which is the type that has both features of BASIC and BUY_ONLY type:
Creation commands in
acmd:const auctionKind = api.createType("AuctionKind", buyNowPrice, 1) await api.tx.auctions.createAuction(auctionKind, [forgeId, assetKindId, assetId], startPrice, duration_millisec).signAndSend(keypair, result => {console.log(JSON.stringify(result))}) -
BUY_ONLY: which buyer can directly buy the asset for buyNowPrice
Creation commands in
acmd:const auctionKind = api.createType("AuctionKind", 2) await api.tx.auctions.createAuction(auctionKind, [forgeId, assetKindId, assetId], buyNowPrice, duration_millisec).signAndSend(keypair, result => {console.log(JSON.stringify(result))})
After executing the creation commands, we will get logs like:
{
  "dispatchInfo": {
    "weight": 1867546902,
    "class": "Normal",
    "paysFee": "Yes"
  },
  "events": [
    {
      "phase": {
        "ApplyExtrinsic": 1
      },
      "event": {
        "index": "0x1700",
        "data": [
          206,
          4,
          42
        ]
      },
      "topics": [

      ]
    },
    {
      "phase": {
        "ApplyExtrinsic": 1
      },
      "event": {
        "index": "0x0906",
        "data": [
          220800000
        ]
      },
      "topics": [

      ]
    },
    {
      "phase": {
        "ApplyExtrinsic": 1
      },
      "event": {
        "index": "0x0000",
        "data": [
          {
            "weight": 1867546902,
            "class": "Normal",
            "paysFee": "Yes"
          }
        ]
      },
      "topics": [

      ]
    }
  ],
  "status": {
    "InBlock": "0x0eb7d6540e3030a0662b988dc2fde2e38f1bdc11c94f27d1334301db67d25e2b"
  }
}
Pay attention on the event whose index is "0x1700". This indicates the auction/Created event that contains auctionId (ex: 206), forgeId(ex: 4), and assetKindId(ex: 42).
"event": {
    "index": "0x1700",
    "data": [
        206,
        4,
        42
    ]
}
As we can see in the event, we just put our asset which assetKind is 4x42 on a new auction 206.
Query Auction
We can query active auction using auctionId in acmd:
JSON.stringify(await api.query.auctions.auction(auctionId))
example output:
'{
  "active_index": 0,
  "auctioneer": "SUqyEgGoeQyCYMJiTGVkqnHHMeH4S6KNjKoV66ku4bLFn1rL",
  "kind":
  {
    "WithBuyNow": 20000000000
  },
  "asset": [4,42,1],
  "starting_price": 10000000000,
  "start_at": 1620189576002,
  "duration":60000
}'
Bid on Auction
For Basic or WithBuyNow type auction, we can bid on the auction through acmd by following command:
await api.tx.auctions.bid(auctionId, biddingPrice).signAndSend(keypair, result => {console.log(JSON.stringify(result))})
Directly buy through Auction
For BuyOnly or WithBuyNow type auction, we can directly buy the asset on auction through following command:
await api.tx.auctions.buy(auctionId).signAndSend(keypair, result => {console.log(JSON.stringify(result))})
Run your own Agence Node
Running your own Agence Node allows you to validate the on chain data without trusting a 3rd party node rpc endpoint, which can be modified to return false results. You also retain more fine grained control on the performance of the Node. While public nodes are available, they may be subject to network congestion.
To join the takecopter testnet, run:
~/.agence/bin/agence --chain tak
The chain will take some time to synchronize. 🚀🚀🚀🚀🚀🚀🚀
Running a Validator
Requirements
The easiest way to run a validator is to run one on a Linux machine on a cloud server.
Hardware
The reference hardware for nodes is a e2-medium machine on the Google Cloud Platform (GCP). It is recommended to use hardware that at least matches the specs
of the reference hardware to ensure the validator processes all blocks in time. Using subpar hardware can possibly run into performance issues, get less era points, and/or potentially get slashed.
Note that this is not a hard requirement for running validator, but rather a best practice for smoothly running a validator node.
Connect to testnet as validator
Step 1: Sync data
Before preparing a validator, begin syncing your testnet node by following commands:
~/.agence/bin/agence -d ~/agence/ --chain tak --name node_name --validator --no-telemetry --prometheus-external
During the data syncing process, you can open a new terminal and go to next step.
Step 2: Generate secret phrase
Generate secret phrase:
~/.agence/bin/agence keys generate
It will show following output, please copy your secret phrase for later use:
Secret phrase `author explain property conduct state jacket ankle orphan cancel pear install blouse` is account:
  Secret seed:      0x7ad2ab9e4be6ae53d6a407a3fb557c7b860a25dee529e090cc3aff9453bd8abe
  Public key (hex): 0x3c1631eb6c27301fee59c2ced27c821ee65fd5e38ac2f5a7cc4be9a03e5a6a44
  Account ID:       0x3c1631eb6c27301fee59c2ced27c821ee65fd5e38ac2f5a7cc4be9a03e5a6a44
  SS58 Address:     iBeyeKnGrBHZacyukW4gvyyDnSZrYoAHjJHbHSLGxPefQVHmG
Step 3: Generate keystore files
Prepare validator keystore files through acu:
~/.agence/bin/agence genesis prepare-validator
And key-in the secret phrase we copied from Step 2:
Enter Mnemonic: author explain property conduct state jacket ankle orphan cancel pear install blouse

//The information below are important for later steps!
{
  "stash_id": "5DtFkWnAjtHdpJJL9LeWJkLyJopDMCZfqaywY1dWmYUsmDpW",
  "controller_id": "5DD9kVnegpwJMKZozjyQ7nLKx151V9VGHSQchMMZcQNhYiY2",
  "grandpa_id": "5CVHtaBHvM2GxEMq6ynbBdqWvCub7nFm7532Yd4Wofp1anuf",
  "babe_id": "5GhHQqqfLUR2zFb6Esrdf8Pf1PhfRJDd6Zzb6wXicrV1WgXd",
  "im_online_id": "5GhHQqqfLUR2zFb6Esrdf8Pf1PhfRJDd6Zzb6wXicrV1WgXd",
  "authority_discovery_id": "5GhHQqqfLUR2zFb6Esrdf8Pf1PhfRJDd6Zzb6wXicrV1WgXd",
  "node_key": "12D3KooWFvW3jFTHmkD1VUqdTDJVDawyp8TvTDD9dAn2CK5GaiGr"
}
then copy the generated keystore files to the base path:
cp -r node0/chains/agence/keystore ~/agence/chains/takecopter
restart your node using ctrl + c to shutdown and restart again with the same command:
~/.agence/bin/agence -d ~/agence/ --chain tak --name node_name --validator --no-telemetry --prometheus-external
Step 4: Bond HME
Since we have prepared our keystore files, we still need to setup a pair of accounts(Stash account and Controller account) to act as the validator role in testnet.
Stash account acts as the custodian of validator's staking funds and delegates some functions to controller account.
Controller account is used to control your validator's behavior.
We can inspect our stash account and controller account:
~/.agence/bin/agence key inspect
then use {secret_phrase}/stash or {secret_phrase}/controller to get stash account address or controller account address in ss58 format:
/* Inspect stash account info, please save `Secret Key` and `SS58 Address` for later use */

Enter Suri: author explain property conduct state jacket ankle orphan cancel pear install blouse/stash
Secret Key URI `author explain property conduct state jacket ankle orphan cancel pear install blouse/stash` is account:
  Secret seed:      n/a
  Public key (hex): 0x508021c13d38d92ddc840ee86ab195d656dbd0f69c93cfc7eb9596402619316b
  Account ID:       0x508021c13d38d92ddc840ee86ab195d656dbd0f69c93cfc7eb9596402619316b
  SS58 Address:     iBfSQkaRuzWciA2pxQKK6xDgfsD77uoduYmdYkfKaXNyKAHU5


/* Inspect controller account info, please save `Secret Key` and `SS58 Address` for later use */

Enter Suri: author explain property conduct state jacket ankle orphan cancel pear install blouse/controller
Secret Key URI `author explain property conduct state jacket ankle orphan cancel pear install blouse/controller` is account:
  Secret seed:      n/a
  Public key (hex): 0x32ad5cbf29bf12fe5e334a5b1f30bcf4cf2f7e29b9d4fb65ffd7bcfa98741162
  Account ID:       0x32ad5cbf29bf12fe5e334a5b1f30bcf4cf2f7e29b9d4fb65ffd7bcfa98741162
  SS58 Address:     iBemJkZSPwTGNh46SFidzmFg2WQMv3kZVzd4Dv13dNEs8wrei
We got our stash account: iBfSQkaRuzWciA2pxQKK6xDgfsD77uoduYmdYkfKaXNyKAHU5, and controller account: iBemJkZSPwTGNh46SFidzmFg2WQMv3kZVzd4Dv13dNEs8wrei
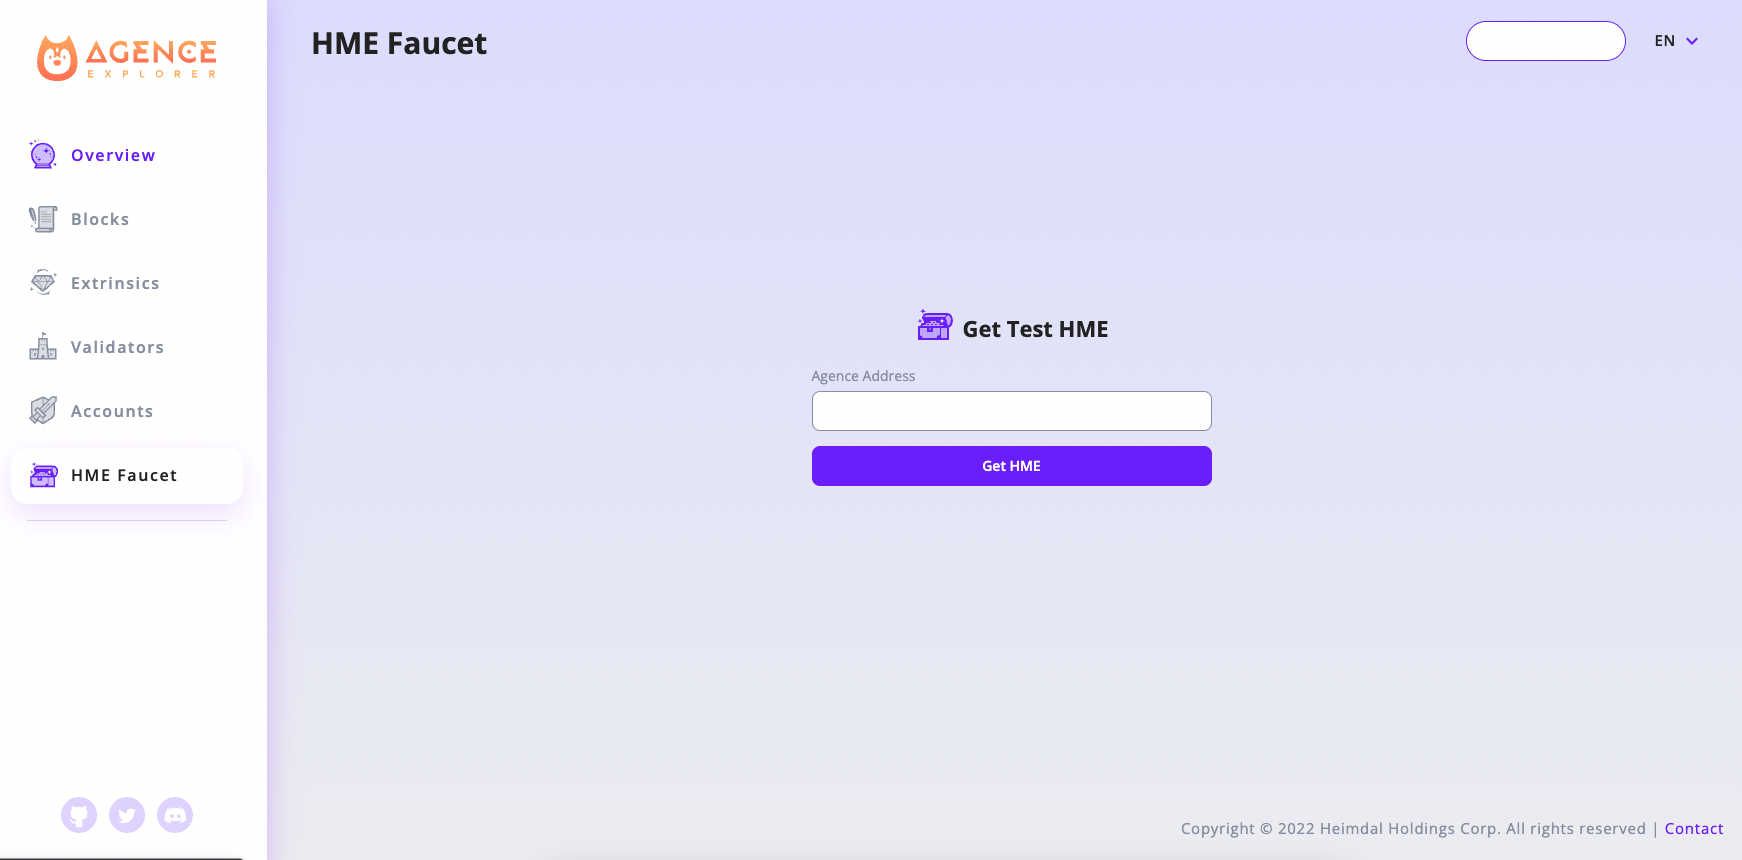
Before using the accounts on the testnet, we need to get some HME from testnet faucet.
Key in ss58 address of the stash account to get some HME:
And run the following commands in acmd to bond somes stake to your controller account:
const stash_suri = 'author explain property conduct state jacket ankle orphan cancel pear install blouse/stash'

//Add stash account keypair into keyring
const stash_account = this.keyring.addFromUri(stash_suri, {})

const controller_suri = 'author explain property conduct state jacket ankle orphan cancel pear install blouse/controller'

//Add controller account keypair into keyring
const controller_account = this.keyring.addFromUri(controller_suri, {})

//Check stash account's balance
(await api.query.system.account(stash_account.address)).toHuman()

// To make sure controller account have enough balance for signing extrinsics and maintaining existential_deposit,
// it's better to transfer more than just the existential_deposit */
const transfer_amount = api.consts.balances.existentialDeposit.toBigInt() * 10n

//Transfer some balance from stash account to controller account
api.tx.balances.transfer(controller_account.address, transfer_amount).signAndSend(stash_account)

//Check controller account's balance
(await api.query.system.account(controller_account.address)).toHuman()

/* The stake fund amount that stash account want to bond to controller account.
The more staking fund your validator have, the higher chance that it will be choosen as active validator */
const stake_amount = api.consts.balances.existentialDeposit.toBigInt() * 100n

//Bond some stake to your controller account
api.tx.staking.bond(controller_account.address, stake_amount, 0).signAndSend(stash_account)
Step 5: Set session keys
To associate the controller account(we made in Step 4) with our validator node, we need to submit an extrinsic in acmd to set session keys.
// The corresponding Ids from Step 3
const grandpaId = api.createType("AccountId", '5CVHtaBHvM2GxEMq6ynbBdqWvCub7nFm7532Yd4Wofp1anuf')
const babeId = api.createType("AccountId", '5GhHQqqfLUR2zFb6Esrdf8Pf1PhfRJDd6Zzb6wXicrV1WgXd')
const imOnlineId = api.createType("AccountId", '5GhHQqqfLUR2zFb6Esrdf8Pf1PhfRJDd6Zzb6wXicrV1WgXd')
const authorityDiscoveryId = api.createType("AccountId", '5GhHQqqfLUR2zFb6Esrdf8Pf1PhfRJDd6Zzb6wXicrV1WgXd')

await api.tx.session.setKeys([grandpaId, babeId, imOnlineId, authorityDiscoveryId], new Uint8Array()).signAndSend(controller_account, (result) => {console.log(JSON.stringify(result))})
Step 6: Validate
Finally, we need to submit a validate extrinsic in acmd to tell testnet that we want to participate as a validator.
await api.tx.staking.validate({"commission": 0}).signAndSend(controller_account, (result) => {console.log(JSON.stringify(result))})
Claiming Rewards
After each era, rewards are paid to validators and nominators, but require executing an extrinsic to receive them.
/* The era number that your validator has earned reward.
You can check rewarded eras in https://explorer.takecopter.agence.network/validators/{stash_account_address} */
const rewardEra = 546

//Claim your reward as validator
await api.tx.staking.payoutStakers(stash_account.address, rewardEra).signAndSend(controller_account, result => {console.log(JSON.stringify(result))})
Stop validating
To stop validating, you must first declare no desire to validate with the chill extrinsic.
await api.tx.staking.chill().signAndSend(controller_account, (result) => {console.log(JSON.stringify(result))})
Your validator will become inactive in next era, then you can gracefully shut down your agence node by ctrl + c.
After it becomes inactive in the next era, if you plan to not only shutdown your node but also unbond your funds or claim rewards, you should do the following actions after submitting chill extrinsic:
//Purge session keys
await api.tx.session.purgeKeys().signAndSend(controller_account, (result) => {console.log(JSON.stringify(result))})

const unbond_amount = (await api.query.system.account(stash_account.address)).data.feeFrozen

//Unbond your funds from controller
await api.tx.staking.unbond(unbond_amount).signAndSend(controller_account, result => {console.log(JSON.stringify(result))})